Category Archives: Articles and Updates

Accessible Kitchen Design – Aging in Place


With an ever-increasing number of multi-generational family members under one roof, accessible kitchen design focuses on residential kitchens that need to be adaptable to the needs of many, including older people who may have individualized food preferences and those with specific dietary requirements. The space will require freedom of movement without extended travel distances, tight passageways, or physical barriers. It will require designs that offer ease of use and access to functional storage, requiring accommodations in cabinet design, floor space, counter heights, and more. The space should continue to encourage conversation and connectivity while family members and friends are gathered around the kitchen table.

As pointed out in the Age in Place blog, the location of the kitchen within the house is also of vital importance: “Kitchens should be located on the main level of the home. If not, you should consider remodeling to add one, as food preparation is an activity of daily living (ADL) and some portion of time daily is spent there.” ]

CHALLENGES IN ACCESSIBLE KITCHEN DESIGN

Accessible kitchen design challenges designers to provide for an individual’s physical inability to stand for extended periods of time, and the loss of upper-body strength that may make it difficult to use wall cabinets for storing heavy items. Counter height is also of vital importance within the kitchen work triangle. Potential solutions include the following:

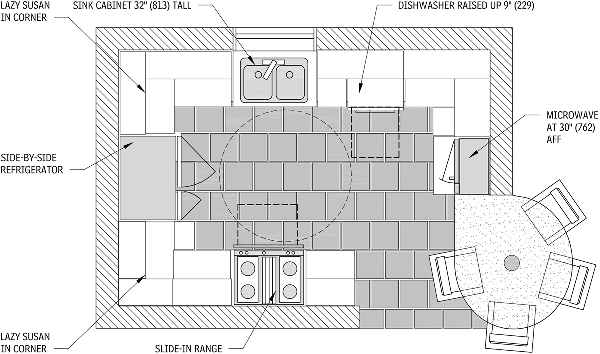
  • Keep the footprint of the kitchen work triangle small, with the sum of the three sides no greater than 26 ft., and each side no less than 4 ft.
  • Vary counter heights to allow cooks to stand and sit when necessary, by providing at least one knee space under the counters, space for a stool to be stored when not in use, or both.
  • Lower the bottom box of upper cabinets to 15 in. above the counter, and specify full‐extension drawer glides and pullout drawers for all lower‐cabinet storage.
  • Use pull hardware rather than knobs for easier grasping.
  • Choose contrasting colors for flooring, cabinets, counters, and so on, which will greatly help the visually impaired cook.

ACCOMMODATING MULTIGENERATIONAL FAMILY MEMBERS IN WHEELCHAIRS

To accommodate a wheelchair in your kitchen cabinet design, it’s important to make sure that your kitchen has adequate floor space for the chair to move and turn. A distance of 48 to 60 in. between countertops is recommended. To increase kitchen accessibility, include multiple counter heights or pull-out bread boards for more flexible work spaces.

Accessible kitchen design requires base cabinets with a higher, deeper toe kick. Also consider leaving a knee space under the microwave oven, with a maximum height of 30 to 32 in. If that is not an option, it is important to at least avoid placing the microwave over a cooktop, due to the danger of lifting a hot dish from an upper height and over a possibly hot cooktop. Positioning a microwave at a lower height and near a landing pad permits the safe transfer of hot containers. Many types of microwave drawers are available, as well as a microwave with a reversible door. Another way to make a kitchen space more efficient and usable is to raise the dishwasher 6 to 18 in. above the floor, which gives everyone easier access.

Kitchen Plan

INDUCTION COOKTOPS AND OTHER INNOVATIONS

Beyond the underlying structure of the kitchen itself, many modern appliances can make a kitchen work triangle more accessible for multigenerational family members.

For both younger and older members of the household who might have trouble opening the main refrigerator, a smaller refrigerator, can be a significant upgrade. Also consider refrigerator drawers for breakfast items and snacks.

For family members who will be cooking, a smooth electric cooking surface is easy to clean and avoids the flame of gas‐supplied heat. Induction cooktops are especially useful: they have the added safety measure of not heating up their surface, instead transferring the energy directly to the cooking utensil. Should gas be the preferred fuel choice, many units are designed with sealed burners, recessed below the surface of the range, which help protect the user from a tall open flame.

Regardless of whether a kitchen features an electric cooking surface, an induction cooktop, or a sealed-burner gas stove, controls in the front (vs. on top) allow for greater safety. Types of control knobs and buttons should be based on users’ ability level. Also, a portable induction cooktop might be a versatile addition for a seated cook, as it can be used outdoors, too.

In terms of ovens, a side‐open oven is a positive addition as it eliminates the need to lift hot items over a hot oven door to remove them. Ideally, a heat‐resistant surface should be installed below and next to the oven to facilitate lifting out the hot food and sliding it over, and then closing the oven door.

Aginginplace.com has a list of other important kitchen items for aging in place, including a lazy Susan in a deep corner cabinet, full-sized oven mitts, large-handled utensils, and even an under-counter jar opener.

FURTHER READING ON AGING IN PLACE

These and other suggestions and diagrams are now available with AGS Online. For more than 85 years, Architectural Graphic Standards (AGS) has sought to provide architects with the most current design practices and standards. With the power of electronic online publishing, AGS Online is able to continuously update technical and design knowledge in an industry that can’t wait on traditional book publishing. “Aging in Place—Accessible Kitchen Design” is one of many AGS Online series that addresses the needs of an aging population and reflects the current standard of care in building design. It includes a step-by-step design process, and figures that show current best practice in addressing the needs of the modern family.

Why Windows Leak


The number one cause of water intrusion and why windows leak in buildings is incorrect window installation. As the popularity of using windows with nailing fins for both new construction and replacement projects grows, design professionals need to understand how these types of windows are correctly specified, installed, and tested. Generally, the windows themselves perform well, but problems can arise during the window installation step, when the contractor puts the window in the hole and seals the window in place.

“Why Windows Leak” reviews the industry standards of window installation and provides step-by-step instruction of the installation process. While designers and contractors do have options based on their personal preferences and project scope, this article focuses on the most commonly used installation method.

Standard Window Installation Methods

To prevent window leaks and other issues related to water intrusion, proper window installation is paramount. Windows should be selected and installed in accordance with the manufacturer’s installation instruction, although those are not always provided. In these cases, there are several window installation standards for various types of windows including ASTM E2112, “Standard Practice for Installation of Exterior Windows, Doors and Skylights,” and AAMA 100, “Standard Practice for the Installation of Windows with Flanges or Mounting Fins in Wood Frame Construction.”

According to the ASTM standard, there are four different methods for proper window installation with nailing flanges (A, B, A1, and B1) based on the order that the building products are installed and how the flashing is installed at the mounting flanges. Below are the standard installation methods:

Method WRB Application Flashing Application
A Applied after the window installation Applied over the face of the mounting flange
B Applied after the window installation Applied behind the mounting flange
A1 Applied prior to the window installation Applied over the face of the mounting flange
B1 Applied prior to the window installation Applied behind the mounting flange

While all four ASTM window installation methods are acceptable and will combat water instrusion, the most common method seems to be Method A1 due to construction scheduling. It is also the method recommended by AAMA. Each project is unique and you may find that one of the other installation methods is more appropriate to your project. Step-by-step instructions for window installation method A1 when using a sheet‐type building wrap water-resistive barrier can be found here.

Fighting Window Leaks

According to Aaron Seward, in his June 2011 article When It Leaks It Pours in ARCHITECT, “seventy (70%) percent of all building litigation is a result of water intrusion through the building envelope” and most of the water intrusion problems occur at openings in the building enclosure. With the growing use of finned windows in multifamily construction and small office buildings, the proper selection and installation of these types of windows is important. Design professionals must understand how finned windows are integrated with the water‐resistive barrier, flashing, and exterior cladding. Besides windows, a barrier can be created in nearby walls with sealants, tapes, and primer to form a water‐resistive barrier membrane. The substrate and membrane together will provide an air barrier.

Water Leakage Testing

Water leakage is tested according to ASTM E 331, “Standard Test Method for Water Penetration of Exterior Windows, Curtain Walls, and Doors by Uniform Static Air Pressure Difference,” and AAMA 501.1, “Standard Test Method for Metal Curtain Walls for Water Penetration Using Dynamic Pressure.”

Test pressures usually match those for air infiltration. The architect should take care to establish leakage criteria beforehand. Frequently acceptable criteria are water amounts appearing on interior sills small enough to not run off the mullion. The static pressure test is more common, but might give an optimistic result because the test procedure may suck glass against gaskets, making a better than expected seal. Dynamic testing, which may help reveal leaks that would occur under the buffeting conditions of variable winds, is particularly effective at operable sash.

For more on window performance, click here.

Risks of Water Intrusion

According to the Institute of Inspection Cleaning and Restoration Certification, water damage can be deceptive. Water is capable of finding its way—whether through poorly installed windows or by way of other means—into structural cavities, where it wreaks havoc. If it goes undetected, that moisture can cause damage over a long period of time. This damage, at the very least, can result in odors and possibly discoloration. Greater damage will surface when materials delaminate, shrink, split and further deteriorate to the point where the only solution is expensive repairs.

Finding Window Leaks

If you do have a water intrusion via a window, finding the source can help you understand why the window is leaking, and vice versa. According to American Leak Detection, there are two key places to inspect right away if you see a leak or any signs thereof:

  • The meeting of the window edge and wall, both on the interior and exterior of the house
  • The rubber seal between the frame of the window and the pane of glass

It is important to remember, the ALD says, that “[e]ven if the amount of water entering your home is small, more water could be stuck inside the wall itself, and this could lead to severe mold or structural damage,” so be thorough when examining leaks.

More Information About Window Selection

For more information, see the AAMA Window and Door Selection Guide:

“This guide has been prepared to assist architects and specifiers in selecting windows to meet the requirements for specific jobs and conditions. It covers all classes of windows: storm, interior insulating, residential, commercial, heavy commercial and architectural. Design considerations provide information of significant value in planning for the best use of windows; therefore, a description of the various types of windows is available and a discussion of their particular characteristics is also included. Plus, performance requirements, as recommended by AAMA. Basic test method details are also reviewed.”

The guide is downloadable by going to the AAMA catalog and looking up “WSG-11”.

Current subscribers, check out the latest update to AGS Online, “Why Windows Leak.”

Not a subscriber? Sign up here

Demystifying Gutter and Downspout Sizing


Gutters and downspouts are common components on the majority of all residential and commercial buildings with steep slope roofs. But given their importance, why is it that architects and builders seem to fail to go through the process of designing this important storm water drainage element but leave them incorrectly sized, or even worse, not sized at all?

Perhaps it is because they ‘straddle the fence’ of architectural and plumbing components. While their design documentation is shown on architectural drawings and in specifications, their design requirements are found in the Plumbing Code, which is maintained and updated separately. In 2015, the International Plumbing Code was updated to reflect new knowledge on storm drainage providing the correct sizing of gutters and downspouts as well as new Code requirements.  With AGS online, we can help you to manage both architectural and plumbing components by providing up-to-date information on code requirements and calculations as well as architectural specifications.

Since 1932, Architectural Graphic Standards (AGS) has sought to provide architects with the most current design practices and standards. With the power of electronic online publishing, AGS Online is able to continuously update technical and design knowledge in an industry that cannot wait on traditional book publishing. “Gutters and Downspouts: Sizing Calculations” is the first of the AGS Online series and reflects the current standard of care in building design for this subject. It includes a step-by-step design process, ICC table and figures, and a sample design problem and solution.

Sorting Out Gutter Sizes

The simplest method for calculation of flow rates is the rational method equation. While not as sophisticated as other methods, it is the method most commonly used. Rational equation calculators can be found on the Internet, or the calculations can be easily performed manually. Calculating the proper gutter size for a project is done with a simple calculation: Q = cia, where

Q = Flow rate in gallons per minute
c = Rational method runoff coefficient
i = Rainfall intensity, inch per hour, converted to gallons per minute
a = Drainage area of the roof in square feet

Rational method runoff coefficient (c) is a function of the characteristic of the roof surface area. Some published guidelines recommend a coefficient of 0.75 to 0.95 for most roof surfaces; however, a conservative runoff coefficient of 1.0 is recommended, assuming an impervious roof membrane with 100 percent runoff.

Drainage area of the roof (a) is the portion of the roof that is served by the gutter. The drainage area is then expressed in square feet. If the roof has parapets or walls around all of it or a portion of it, the vertical walls will contribute to additional water on the roof. Therefore, one‐half of this wall area should be added to the roof area.

The resultant calculation (Q=cia) will be the flow rate for the roof design.

Gutter dimensions are selected from the Horizontal Gutter Sizing Table, based on the slope of the gutter to the downspout(s) and the gutter capacity based upon the roof flow rate, in gallons per minute.

Assessing Rainfall Intensity

To properly size gutters for installation, you need to know the local rainfall intensity. This is taken from charts in the Code based on data from the National Weather Service, National Oceanic and Atmospheric Administration for 100‐year rainfall in a 1‐hour duration, expressed in inches. Select the rainfall intensity for your building location from the figures located here. Then, convert from inches per hour to gallons per minute per square foot by multiplying the rain intensity in inches by 0.0104.

Here is an example of a rainfall intensity chart, in this case for the eastern United States:

Rainfall Map

The Importance of Gutter and Downspout Sizing

According to the houselogic blog, properly sized gutters and downspouts are an integral part of keeping water away from the foundation of a structure. If the gutters and downspouts are not sized and installed properly, it can lead to severe and expensive damage to the entire building.

How To Install Gutters

Properly sized gutters are not going to do their job if installed improperly, so keep these important notes regarding the design of gutters and downspouts in mind throughout the sizing and installation process:

  • Continuous gutters may be formed at the installation site with cold‐forming equipment, thus eliminating joints in long runs of gutter.
  • Gutters and downspouts are available in aluminum, galvanized steel, copper, and stainless steel. Consult manufacturers for custom materials.
  • Girth is the width of the sheet metal from which a gutter is fabricated.
  • Although all joining methods are applicable to most gutter shapes, lap joints are more commonly used. Seal all joints with mastic or by soldering. Lock, slip, or lap joints do not provide for expansion.
  • Expansion joints should be used on all straight runs over 40 ft. In a 10‐ft section of gutter that will undergo a 100° temperature change, linear expansion will follow these coefficients of expansion (CE) and movements: aluminum: CE, .00128, movement, .15 in.; copper: CE, .00093, movement, .11 in.; galvanized steel: CE, .0065, movement, .08 in.
  • Always keep the front of the gutter lower than the back.
  • Use a minimum width of 4 in., except for canopies and small porches. The minimum ratio of depth to width should be 3 to 4 inches.
  • Many custom shapes for gutters and downspouts are available; consult manufacturers’ design manuals.

Flat Roof Draining and Gutters

Scuppers that empty into a gutter may be integrated with a roof edge. The scuppers are soldered into a formed gravel‐stop fascia system. The suggested maximum scupper interval is 10 ft. The front rim of the gutter must be 1 in. below the back edge, and it should be below the nailers used to elevate the roof edge. The drip edge on the fascia should lap the back edge of the gutter a minimum of 1 in. The gutter must be free to move behind the fascia.

Combination Scupper and Gutter

Current subscribers, check out the latest update to AGS online,Gutters and Downspouts: Sizing Calculations.”

Not a subscriber? Sign up here.

Dennis J. Hall, FAIA, FCSI

Using AGS Student Edition + graphicstandards.com In Your Course


The Student Edition of Architectural Graphic Standards (AGS) has been a staple of the architecture classroom for over 20 years.   Now, along with the new edition of this core textbook, there is Graphicstandards.com, a subscription-based, fully searchable online reference that provides unlimited access to the text, drawings, details, and tables found in the professional version of our print product.

To help you better understand the benefits of using the AGS textbook in combination with the new online reference, we asked Keith Hedges, editor-in-chief of the new AGS Student Edition text, to provide more detail on the benefits of integrating Graphicstandards.com into your classroom.

Q: How can I incorporate graphicstandards.com into my course activities?

A: We have an Instructor’s Manual available on the instructor companion website which includes sample lecture slides, exam questions, and projects available as individual .pdfs and editable .docx formats. Instructors can also utilize the thousands of AIA-endorsed details available on graphicstandards.com to quickly create course content by importing selected details, tables, figures, and text into PowerPoint lectures, tailor images to create examination questions, and provide clues as to what ready-to-edit CAD files may be needed for students to customize their final drawings.  The downloadable details are ideal to prepare the students for the new ARE 5.0 click-and-drag, hot spot, and case study, graphic-based question types.

Q: Are there any sample syllabi available for instructors?

A: Yes. Detailed sample syllabi covering various course types, such as technology and design studios, provide ideas on how to fully integrate the new AGS Student Edition (SE.) The new AGS SE is shown as a required text and provides the chapter and page numbers for associated readings. The course content can be paired with the rich AGS SE index to easily find associated content and images through the graphicstandards.com refined search filters.

Q: What benefits are there for students using graphicstandards.com in their coursework?

A: AIA endorsed standards provide a solid foundation for students to build upon.  While the standards are foundational elements, the students must bring in their own expertise and knowledge to bear when using and customizing details for their own academic needs.  Graphicstandards.com is a verified source that you can trust.

Q: How is graphicstandards.com beneficial to instructors and students as a research tool, particularly in the studio environment.

A: Graphicstandards.com is a powerful research tool with thousands of available details where students can quickly find solutions to design problems or research topics by using the advanced search filters with the aid of the book’s index. The graphic details in non-AGS texts are often lacking in number and quality, forcing students to explore within a domain of online resources from product vendors or unknown and unproven resources, which means that the details may be incomplete, inaccurate, or inappropriate for their building’s context. Finding resources in the vast online realm can be very overwhelming to students. Having the fully searchable database of AIA-endorsed details (downloadable in .dwg, .dgn, and .dxf formats) allows students to spend less time looking for credible sources and ensures they can focus their attention on projects and coursework instead of pouring through vast manufacturer websites or endless Google searches.

Q: Is there complimentary instructor access or discounted student pricing for graphicstandards.com?

A: Instructors receive a full year subscription with adoption of graphicstandards.com for their course and students receive free one-month access to graphicstandards.com with the purchase of any new print or eBook of Architectural Graphic Standards Student Edition, 12e.  A discounted student subscription rate is then available after the free trial expires.

Q: Does graphicstandards.com work on mobile devices like smart phones and tablets?

A: In addition to PC and MAC, students can design anytime and anywhere by accessing graphicstandards.com using portable devices while on the go, 24/7.

With both print and digital options available, we give you the power to teach your students in a multitude of ways, ensuring they can learn in the format they prefer.   As you can see, there are many benefits to adopting both Architectural Graphic Standards Student Edition and graphicstandards.com as an online tool for your classroom.  Visit www.graphicstandards.com/student-edition-page/ for more information and to request an examination copy of the new textbook and start your free one-month trial subscription.

Taxes, Death, and Cracks in Stucco Walls


As an exterior cladding material, Portland cement plaster, or stucco, is a versatile material and used in traditional, modern, and contemporary designs. It can provide either an ornate or simple, clean look. But, as the old adage goes, “there are three things in life you can count on …” and the most reliable of these is that when stucco hydrates, it shrinks and hairline cracks form. Regardless of design style, if you design with stucco, it is absolutely imperative to understand how it performs and why.

Whether you specify a traditional three-coat application or a one- or two-coat modified polymer system, understanding the basics of Portland cement plaster design and installation will ensure that you get the aesthetics and performance results right, including the building code requirements often found in reference standards and industry best practices.

How to Patch Stucco

According to doityourself.com, cracks are quick and easy to fix. Small cracks can be filled simply with a coat of paint, while thicker cracks may be cauked.  Meanwhile, very large cracks and holes require more attention. You will need to clear out the damaged portion of the stucco and then carefully refill it with several applications of new stucco, while replacing damaged mesh or tar paper if needed.

The total thickness of 7/8 in. for three‐coat work is required, in accordance with ASTM C926. While the adage of “all stucco cracks” is generally true, the use of reinforcing mesh or fibers in the plaster, along with correct placement of control joints, can help mitigate cracking. Hot weather and accelerated drying time can also contribute to cracking, thus curing of the stucco is important in these conditions. Controlling cracks in stucco means fewer callbacks for the contractor, lower maintenance cost, and enhanced curb appeal.

Stucco and the Weather

As another old adage goes, “the best offense is a good defense.” Proper care and preparation of stucco can help reduce the need for stucco repairs later on. The majority of stucco walls, whether traditional hard‐coat or proprietary systems, are installed on metal lath over wood or metal stud construction. As such, they are designed as drainage plane walls with metal lath over a water‐resistive barrier (WRB).

Stucco requires weather barrier behind the lath to control the penetration of water. The paper must be continuous and properly shingled over each sheet and accessories to direct the flow of water. The weather barrier gets wet during application of the stucco and, after drying, pulls away from stucco, creating the drainage plane.

Best industry practices are to use a rainscreen system, incorporating a drainage mesh between the WRB and the lath. The basic components of the wall and their requirements can be found here.

The selection, installation, and protection of the WRB are the most critical components in the weather‐resistance of the wall. The WRB should be installed with cap nails, screws, or wide crown staples; slap staples can tear the barrier and should not be used. Care should be taken to seal wall penetrations and protect the WRB. When installation of multiple layers of WRB is required, each layer shall be installed in an independent manner so that each layer provides a continuous drainage plane.

Building wrap and fluid‐applied WRBs have increased in popularity and are accepted by building officials as an alternate material to asphalt felt. The Code requires that these types of WRBs be installed in accordance with the manufacturer’s installation instructions, which may include taping of joints of sheet material, when used as an air‐barrier. If two layers are required, local codes may also require a specific layering pattern.

PC Plaster

STUCCO REPAIRS: IN THE COLD

According to cement.org, “the temperature of newly applied stucco should be maintained at a minimum of 40 degrees Fahrenheit. In many cases, this can be achieved by heating the structure and covering the exterior surfaces.”

For temperatures lower than that, the ingredients themselves can be heated before mixing the plaster. Water and sand are good at holding heat due to their mass, although water is simpler to heat up. If it comes to it, both can be heated and used to provide some extra protection when performing stucco repairs in cold weather. To avoid problems such as flash set of the plaster, though, cement.org does advise that “fresh mixtures should not be heated to temperatures exceeding 120 degrees Fahrenheit.” Additionally, the concrete should be kept from freezing for at least two days following its application, since any excess water will expand and your wall will begin to crack … before it has even had time to set.

STUCCO CONCRETE BASICS

Stucco is a traditional exterior finish material, typically three coats of Portland cement plaster, applied over weather barrier to create a drainage plane wall system. It is impact‐ and fire‐resistant; and because it is applied in a plastic state, it can be made to conform to virtually any shape. Durable stucco is, however, highly dependent on knowledgeable and skilled application, as many of the problems attributed to stucco (e.g., cracking, delamination, water leakage) are not inherent to the product but are the result of improper installation.

Stucco is applied in three coats: scratch, brown, and finish.

  • The scratch and brown coats are Portland cement plaster, typically each approximately 3/8‐in. thick; together they are called the base coat. The base coat must be moist‐cured for two days, then further curing of five days before application of the finish coat. In very hot or windy conditions, it may be necessary to protect the base coat with tarps or sheeting. The scratch coat is so‐called because, after application, the surface is roughened with a rake or other device to promote a mechanical bond of the brown coat.
  • The brown coat is applied after the scratch coat has set up. IBC requires a minimum or 24 hours between coats if damp‐curing is used, or 48 hours without. In the recent past, one week was common for curing. It is important that the scratch coat be properly cured before the application of the brown coat, to minimize the cracking. The brown coat may be reinforced with a variety of fibers, and it must be trowel‐floated while still moist but after taking an initial set, to densify the surface and further reduce cracking. Application of the brown coat before the scratch coat has properly cured, and failure to make the additional trowel‐float pass, are common causes of cracking in the finished stucco.
  • The finish coat may be either Portland cement plaster or acrylic, typically 1/8‐in. thick. Portland cement‐based finish coats are likely to be more durable, but acrylic finish coats generally have better color consistency. Factory‐mixed finish coat mixes improve color consistency of cement‐based finish coats.

PC Plaster

Current subscribers, to understand more about the performance of Portland cement plaster, check out the latest update to AGS Online,Taxes, Death, and Cracks in Stucco Walls.” (Log in required to view)

Not a subscriber? Sign up here