Category Archives: Articles and Updates

Residential Plumbing, Electrical, Ventilation—Residential Kitchens and Bathrooms


Every family has different needs. If a family entertains often, what size rooms do they need to accommodate the gathering? If there are several children, does each child need their own bedroom? How many bathrooms will the children need? Is there a family member with special needs? The questions are endless. To limit the design possibilities, the designer must identify the family’s most important needs. Wants and desires of lesser importance can be considered later in the design process.

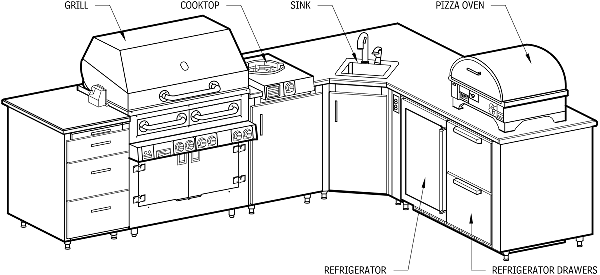
KITCHEN EQUIPMENT ELECTRICAL REQUIREMENTS

For any residential kitchen or bathroom, the electrical requirements and consideration of the loads is very important. Your design should show all the proposed locations of lighting fixtures, power outlets, and dedicated circuits for large individual appliances, and an electrician should confirm whether all of these features will function as intended. Like other professionals, any electrician will need to follow the most recent provision of their relevant reference codes; this usually includes the National Electrical Code (NEC).

The International Residential Code (IRC) should also come into play. Unlike the International Building Code, which covers buildings from a more general level, the IRC specifically focuses on topics involving home construction, applying to one- and two-family detached dwellings and apartment buildings up to three stories.

Besides some of the key facets of kitchens and bathrooms, like plumbing and electrical, it features sections on foundations, framing, mechanical, fuel, gas, and energy, in addition to a standalone set of standards. (Given all that, the IRC code is more complete than the residential code provided by the Council of American Building Officials, its only other predecessor code.)

Electricians usually determine the circuiting arrangements in residential work. For this, they’ll need to know the voltage requirements of large appliances and which lighting fixtures are low voltage, along with any other electrical requirements.

HOUSEHOLD CIRCUITS

Three types of circuits are used in residential households:

  • General lighting circuit: Serves lighting and wall receptacles; 3 watts per square foot of living area is required
  • Small appliance circuit: Distributes power to outlets for plug-in appliances (e.g., toasters, blenders); two 20-A circuits in the kitchen are required
  • Individual appliance circuit: Supports large appliances that are draw a large amount of current, requirements depend on the individual appliance

A rule of thumb for general lighting-circuit receptacles is to plan for twelve outlets for 15-A circuits, and sixteen outlets for 30-A circuits. Examples of devices that might require an individual appliance circuit include refrigerators, ovens, dishwashers, and garbage disposals. Due to the risk of using an electrical device while making contact with metal pipes or fittings that are grounded, kitchen and bath circuits should use a special type of circuit breaker known as a ground fault circuit interrupter, or GFCI breaker. The breaker senses the flow of current, and can cut the flow within a fraction of a second if it gets the signs of the current flowing through a person.

RESIDENTIAL WIRING

When planning a kitchen, it may help to remember the general requirements for residential electrical wiring systems:

SCHEMATIC DIAGRAM OF TYPICAL RESIDENTIAL ELECTRICAL LAYOUT

Schematic Diagram

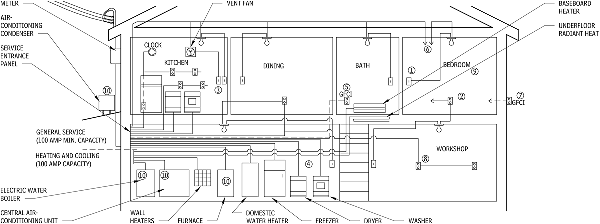
  • Minimum of one wall-switch-controlled lighting outlet (see #1 above)
  • Convenience outlets installed so that no point along the floor is farther than 12 ft. (measured horizontally from an outlet; see #2 above)
  • Minimum of two #12 wire 20-A small-appliance circuits to serve only small convenience outlets, including refrigeration equipment (see #3 above)

For #3, both circuits must extend to the kitchen, although other rooms such as pantries, dining rooms, breakfast rooms, and family rooms may be served by one or both of them. No other convenience outlets may be connected to these circuits, except a receptacle installed solely for an electric clock. In kitchen and dining areas, convenience outlets must be installed at each and every counter space wider than 12 in.

LOADS, CIRCUITS, AND RECEPTACLES FOR RESIDENTIAL ELECTRICAL EQUIPMENT

APPLIANCE TYPICAL CONNECTED VOLTAMPERESa VOLTS WIRESb CIRCUIT BREAKER OR FUSEc OUTLETS ON CIRCUIT NEMAk DEVICEdAND CONFIGURATION
KITCHEN
Rangee 12,000 115/230 3 #6 60 A 1 14–60R
Oven (built‐in)c 4500 115/230 3 #10 30 A 1 14–30R
6000 115/230 3 #10 30 A 1 14–30R
Dishwasherc 1200 115 2 #12 20 A 1 5–20R
Waste disposalc 300 115 2 #12 20 A 1 5–20R
Broilere 1500 115 2 #12 20 A 1 or more 5–20R
Refrigeratorf 300 115 2 #12 20 A 1 or more 5–20R
Freezerf 350 115 2 #12 20 A 1 or more 5–20R
NOTES
  1. Wherever possible, use actual equipment rating.
  2. Number of wires does not include equipment grounding wires. Ground wire is #12 AWG for 20A circuit and #10 AWG for 30A and 50A circuits.
  3. May be directconnected. For a discussion of disconnect requirements, see NEC Article 422.
  4. Equipment ground is provided in each receptacle.
  5. Heavyduty appliances regularly used at one location should have separate circuits. Only one such unit should be attached to a single circuit.
  6. A separate circuit serving only one other outlet is recommended.
  7. Should not be connected to a circuit with appliances or other heavy loads.
  8. A separate circuit is recommended.
  9. It is recommended that all motordriven devices be protected by a local motorprotection element, unless motor protection is built into the device.
  10. Connect through disconnect switch equipped with motorprotection element.
  11. National Electrical Manufacturers Association (NEMA).When working with single-family residential design, architects are also frequently required to consider Residential Plumbing, Electrical, Ventilations requirements in their design layouts. Architects are graphically oriented professionals and need quick access to potential engineering and appliance components that will adapt to a variety of overall floor plans. Now, AGS Online provides graphic illustrations for Residential Plumbing, Electrical, Ventilations in a downloadable format.

FURTHER READING ON RESIDENTIAL KITCHENS AND BATHROOMS

When working with single-family residential design, architects are also frequently required to consider Residential Plumbing, Electrical, Ventilations requirements in their design layouts. Architects are graphically oriented professionals and need quick access to potential engineering and appliance components that will adapt to a variety of overall floor plans. Now, AGS Online provides graphic illustrations for Residential Plumbing, Electrical, Ventilations in a downloadable format.


Vehicular Circulation Considerations—Residential Streets


Residential streets and highways are designed to accommodate a variety of vehicles, up to and including semitrailer trucks. When private driveways and roadways will serve only passenger vehicles, it may be appropriate in some instances to use smaller dimensions. Nevertheless, be certain private roads are wide enough to allow passage of fire and emergency vehicles.

When designing street layouts in residential developments, there are a number of important additional considerations, including safety. The underlying concept of the shared street system is one of integration, with an emphasis on the community and the residential user. Pedestrians, children at play, bicyclists, parked cars, and moving cars all share the same street space.

RESIDENTIAL STREETS AND GUIDELINES FOR HEALTHY NEIGHBORHOODS

When designing street layouts, especially suburban streets and neighborhoods, it’s important to avoid directing major traffic circulation through residential developments. Consider the following four key design criteria for use within residential areas:

  • Minimize the amount of internal travel while maximizing convenience of access to nonresidential activities
  • In any residential street layout, provide a series of spaces in which the road pavement plays an integrated function, as opposed to the typical linear pavement that just facilitates automobile movement
  • Residential streets are regularly used as play areas, so design them to reflect a pedestrian orientation rather than only to facilitate vehicular movement
  • Set the radius of cul‐de‐sacs to the minimum required to accommodate emergency and maintenance vehicles, while considering alternative turnarounds

TRAFFIC CALMING IN RESIDENTIAL DEVELOPMENT

Traffic calming improves neighborhood livability and the pedestrian environment by reducing vehicle speeds and noise, visual impacts, and through‐traffic volumes. Traffic calming includes a variety of design techniques and traffic management programs:

  • Vertical changes to the road (e.g., speed bumps and humps, raised intersections, etc.)
  • Lateral changes in the road (e.g., chicanes, narrowing, traffic diverters, etc.)
  • Traffic circles
  • Small corner radii
  • Gateway features
  • Related streetscaping (street furniture, lighting, landscaping, etc.)
  • Queuing

For streets of up to 750 vehicles per day, traffic and delay considerations do not necessitate the need for more than one traffic lane. A single‐lane configuration is sufficient if parking lanes are incorporated or passing places are provided. For example, the width of residential streets may be as narrow as 20 ft. with parking on one side. Through careful design, this can produce cost savings in grading, drainage, and street construction, and lessen the amount of impervious surfaces.

DESIGN CONCEPTS AND GUIDELINES FOR RESIDENTIAL SUBDIVISION PLANNING

A number of different design concepts may be implemented to help preserve the residential feel when applying street design guidelines for healthy neighborhoods. They can range from on-street parking and shared streets, to more nuts-and-bolts features like sufficient vehicle turning radii and fire vehicle access.

On-Street Parking

On‐street parking should be encouraged whenever possible, as it is a highly efficient form of parking, especially where higher housing densities and a compact neighborhood are desired. On‐street parking should be especially encouraged near the center of the neighborhood planning area, closest to the neighborhood focal point, services, transit stops, and so on. On‐street parking also provides an important physical and psychological buffer between pedestrians on the sidewalk and traffic. The commonly held perception that on‐street parking will create situations where children dart from behind a parked car into passing traffic is not borne out by actual experience.


Shared Streets

The underlying concept of the shared street system is one of integration, with an emphasis on the community and the residential user. Pedestrians, children at play, bicyclists, parked cars, and moving cars all share the same street space. Even though it seems these uses conflict with one another, the physical design is such that drivers are placed in an inferior position. Through geometrical and physical changes in the street cross section and its physical appearance, motorists sense that they are intruding into a pedestrian zone and drive more slowly and cautiously. By redesigning the physical aspects of the street, the social and physical public domain of the pedestrian is reclaimed.

Alleyways

Alleys eliminate the demand for automobile access to the property from the front, reduce the need for curb cuts, and reduce the number of parking garages oriented to the street. Alleys also provide an excellent alternative for utility easements and service access. The typical alleyway right‐of‐way width is 15 to 20 ft., with pavement typically covering the full width of the right of way.

Sufficient Vehicle Turning Radii

The vehicle to be accommodated—the design vehicle—is an important control in the design of urban streets. The most important characteristic of the design vehicle, its turning radius, dictates intersection design. For urban streets, four design vehicles are defined in the American Association of State Highway and Transportation Officials (AASHTO) Green Book.

Vehicle turning radii, as established by AASHTO, are based on broad categories of vehicle types, each of which encompasses a wide variety of actual vehicles on the road. Information on passenger vehicle dimensions for parking design, provided below, provides a more detailed breakdown of vehicle types within the various categories. For off‐street design applications, such as parking and driveways, the more detailed versions are appropriate. For public streets, the AASHTO templates  are definitive.

Design Vehicle Dimensions

VEHICLE LENGTH (L) (ft.in.) WIDTH (W) HEIGHT (H) WHEELBASE (WB) OVERHANG FRONT (OF) OVERHANG REAR (OR) GROSS WEIGHT (LB)
Small car1 14‐9 5‐9 4‐4 8‐5 2‐0 4‐6 3300
All cars 16‐6 6‐1 4‐8 9‐0 2‐6 4‐5 3300
Light truck 18‐11 6‐8 6‐5 11‐5 2‐9 4‐0 6750
Van 18‐8 6‐7 6‐10 11‐3 2‐9 4‐0 7100
Sport/utility vehicle 16‐7 6‐7 6‐2 9‐8 3‐0 3‐8 7000
Sport wagon 15‐8 7‐1 5‐11 8‐10 2‐6 4‐4 5950
Composite passenger vehicle2 17‐2 6‐7 7‐6 9‐11 3‐0 4‐4 6300
Wheelchair lift van (personal use) 17‐8 6‐8 8‐0 11‐6 2‐6 3‐8 6000
Boat trailer 20‐0 8‐0 6‐0 See detail 3‐0 8‐0 4000
RV–conventional trailer 27‐0 7‐0 9‐0 See detail 3‐0 8‐0 4000
RV–fifth wheel (pickup‐based) 34‐0 8‐6 12‐0 8‐0 22‐0 12‐2 3500
RV–folding trailer 16‐0 7‐6 5‐0 8‐6 7‐6 1500
Slide‐in pickup camper 18‐11 10‐0 7‐3 2900
Stretch limousine 24‐6 6‐0 5‐0 15‐6 4‐0 5‐0 9000
Shuttle van (11 passengers) 20‐0 6‐6 6‐10 11‐6 3‐0 5‐6 11,000

Notes:

  1. Small car classes 5 through 7, per Parking Consultants Council (PCC).
  2. A composite passenger vehicle is a design vehicle that encompasses passenger cars, light trucks, vans, and sport/utility vehicles. It is the vehicle for which a parking facility should be designed.

Fire Apparatus Access

According to the U.S. General Services Administration, in its post on site circulation design, ground-level and aerial access for fire department vehicles is an important component of planning. Access for vehicles should be provided, and the local fire department should be consulted regarding the specific requirements for the following:

  • surface material of the access roadway(s)
  • minimum width of fire lane(s)
  • minimum turning radius for the largest fire department apparatus
  • weight of largest fire department apparatus
  • minimum vertical clearance of largest fire department apparatus.

Buildings or portions of buildings exceeding 30 ft. in height from the lowest point of fire department vehicle access shall be provided with access roads capable of accommodating fire department aerial apparatus.

FURTHER READING ON VEHICULAR CIRCULATION CONSIDERATIONS

For more than 85 years, Architectural Graphic Standards (AGS) has sought to provide architects with the most current design practices and standards. With the power of electronic online publishing, AGS Online is able to continuously update technical and design knowledge in an industry that can’t wait on traditional book publishing.

Bathrooms and Layouts—Residential Bathroom Design


The International Residential Code has numerous code requirements for bathroom design. Section R307 provides spatial requirements, including minimum fixture clearances and wall materials for bathtubs and shower spaces. Other code requirements related to plumbing, mechanical, and electrical issues in a bathroom space are in other sections of the code.

Typical bathroom accessories include a medicine cabinet, mirror, soap dish, toilet paper holder, towel bar, and linen storage space. A general guideline is to allow between 24 and 36 in. of towel bar space for each family member using the bathroom.

FIXTURE SIZES AND CLEARANCES 

FIXTURE A B C D E
MINIMUM LIBERAL MINIMUM LIBERAL MINIMUM LIBERAL MINIMUM LIBERAL MINIMUM LIBERAL
Water closet 27″ 31″ 19″ 21″ 15″* 18″ 15″* 22″ 21″* 36″
Bidet 25″ 27″ 14″ 14″ 15″* 18″ 15″* 22″ 21″* 36″
Lavatory 16″ 21″ 18″ 30″ 2″ 6″ 14″* 22″ 21″* 30″
Shower (interior dimension) 30″* 36″ 30″* 36″ 2″ 8″ 24″* 34″ N/A N/A
Bathtub 60″ standard 72″ 30″ standard 48″ 21″ 34″ ** **

*Designates code requirement **Designates “As required by other fixtures”

RESIDENTIAL BATHROOM DESIGN BASICS

When planning the layout and function of residential bathroom accessories, consider the entire bathroom layout. The primary components of any residential bathroom should be fairly familiar:

  • bathtubs and showers
  • plumbing fixtures
  • toilet, bath, and laundry accessories

Bathtubs

Bathtubs are available in many shapes, sizes, and styles, including rectangular, corner, and oval. Three types of installation are common: recessed, drop‐in, and freestanding. Materials for bathtub surrounds include ceramic tile, solid surfacing, molded fiberglass, and acrylic one‐piece units. The surround material is important for coordination purposes during installation. Bathtubs are available in several different materials , though the fiberglass and acrylic units are the most common.

Built-In Bathtub
Built in bathtub

Showers

Showers can be included with bathtubs or be separate fixtures. A bathtub-and-shower combination usually shares a water supply valve. The shower surround may be part of the bathtub or site built. Shower enclosures are generally three sided, with an impervious finish. A shower door or curtain completes the enclosure. These enclosures, also known as “shower stalls,” consist of a floor receptor topped by water‐resistant walls. Receptors may be manufactured or site built and are designed to slope to the drain. The enclosure walls may be either self‐supporting or attached to the house framing.

Typical Site-Built Shower Construction

Plumbing Fixtures

A plumbing fixture is a device or appliance designed to supply water or to receive waterborne waste, and may discharge into a sanitary waste system. Ideal fixture materials should be nonabsorbent, nonporous, nonoxidizing, smooth, and easy to clean. Plumbing codes usually mandate the number and type of fixtures that must be provided for specific occupancy, based on the capacity. Provisions for people with disabilities have been made an integral part of code requirements, which mandate the quantity and design of spaces utilizing plumbing fixtures.

Plumbing fixtures include faucets and sinks, and water closets (toilets) and bidets.

Typical Water Supply and Drainage from a Plumbing Fixture

Bathroom Accessories

Medicine Cabinets

Medicine cabinets can be specified with either left‐ or right‐hand door swings, and are typically available in both surface-mounted or recessed styles. Side-access medicine cabinets eliminates the need to reach over a counter.

Mirrors

Mirrors located above lavatories, sinks, and vanities must be mounted with the bottom edge of the reflecting surface 40 in. maximum above the floor. Other mirrors must be mounted with the bottom edge of the reflecting surface 35 in. maximum above the floor.

Tilting mirrors that extend 4 in. from the wall at the top and 1 in. at the bottom are available in widths of 16, 18, and 24 in. and heights of 30 and 36 in. A full‐length mirror can accommodate most people, including children and wheelchair users.

Americans with Disabilities Act (ADA)/Architectural Barriers Act Accessibility Guidelines 2004 recommend that the top edge of mirrors should be 74 in. minimum from the floor to accommodate both ambulatory people and wheelchair users. The Guidelines require mirrors above lavatories or countertops to be installed with the bottom edge of the reflecting surface 40 in. maximum above the finished floor . Those not above lavatories or countertops are to be installed with the bottom edge 35 in. above the floor.

Soap Dishes

Soap dishes are available both in recessed and surface‐mounted styles, including heavy‐duty and vandal‐resistant versions. For commercial purposes, touch‐free automatic soap dispensers detect the user’s hands and dispense a small amount of soap, but these are generally not used in residential bathrooms.

Accessible soap dispensers over lavatories or countertops should be mounted no more than 42 in. above the finish  floor. Pushbuttons may be mounted up to 48 in. high, depending on the depth of any obstruction to wheelchair use.

Toilet Paper Holders

In addition to clearance requirements, the United States Access Board, ICC/ANSI A117.1, and the ADA include provisions for the location and operation of flush controls and toilet paper dispensers. Manually operated flush controls must be located on the open side of the toilet; they may not be centered above the toilet. The hatched area in Figure “WATER CLOSETS” indicates the allowable location of the toilet paper dispenser. Dispenser outlets must be within the range shown. Dispensers should allow continuous paper flow, not control delivery.

Water Closets
Water Closets
Towel Bars

Residential bathrooms typically include two towel bar locations, one near the sink and another near the tub and/or shower. A general guideline is to allow between 24 and 36 in. of towel bar space for each family member using the bathroom.

Linen Storage Spaces

The options for residential bathroom storage, as with most storage spaces in a house, offer some amount of flexibility and an opportunity for creativity. Stainless steel shelves are available up to 28 ft. long, and are delivered and installed in multiple sections. Full‐extension drawer glides and pullout drawer storage below the counter allow for more accessible storage. Lever handles are more easily operated no matter the users’ age or ability.

The blog fix.com goes so far as to suggest the following storage solution in its post on bathroom design rules: “Most people think of bathroom storage as being under-cabinet space for toilet paper. But here is a novel concept: provide storage space separate from the vanity cabinet. Tall storage cabinets no more than 12” wide can fit in tight places and can satisfy most of your needs.”

FURTHER READING ON RESIDENTIAL BATHROOM DESIGN

Architects are very graphically oriented professionals and need quick access to potential layouts with all the necessary components that will adapt to a variety of overall floor plans. For more than 85 years, Architectural Graphic Standards (AGS) has sought to provide architects with graphic illustrations of the most current design practices and standards. Now, AGS Online provides these graphic illustrations for Bathrooms and Layouts in a downloadable format.

Aging in Place—Safe and Secure Bathrooms


Accessibility Guidelines: CC/ANSI A117.1 defines adaptability as the capability of certain elements to be altered or added so as to accommodate the needs of persons with or without disabilities, or to accommodate the needs of persons with different types or degrees of disabilities. Some codes and civil rights laws require provisions in certain residential bathrooms for adaptable features. All essential considerations for accessible bathroom design.

For single family custom homes or remodeling projects, bathroom designs should be specially tailored to the individual homeowners. If a master bathroom is planned for a wheelchair user, for example, the design should reflect that person’s individual capabilities and preferences.

Note that the Americans with Disabilities Act/Architectural Barriers Act (ADA/ABA) Accessibility Guidelines 2004 are not typically applied to private residential facilities because the previously issued Fair Housing Amendments Act (FHAA) standards already apply. However, bathrooms located in “transient lodging” facilities (e.g., hotels) or public institutional facilities (e.g., hospitals) may be required to meet both the ADA/ABA Accessibility Guidelines and the FHAA standards.

With all these standards in effect, it is imperative to verify current local, state, and national requirements for residential accessible bathroom and toilet room design. “Aging in Place—Safe and Secure Bathrooms” is one of many AGS Online series that address the needs of an aging population and reflect the current standard of care in building design.

PLANNING FOR BATHROOM ADAPTABILITY

According to an article on eastersealstech.com, there are five big questions to ask when it comes to accessible bathroom design:

  1. What bathroom activities require a user to need assistance?
  2. Are there medical supplies necessary and where do they need to be placed?
  3. Is a tub or shower preferred?
  4. What activities does a user do independently where grab bars should be placed?
  5. Will users condition deteriorate over time and what will users needs be in the future?

The article also lists high-priority focus areas: shower and tub, bathroom sink and vanity, toilet, lighting, and general bathroom access and safety.

ACCESSIBLE BATHROOM DESIGN

For such a relatively small space, bathrooms have many different accessible-design aspects that must be considered beyond the obvious issues of entry and function . These include doors, floors, counters, and storage areas.

Doors

Many experienced specialists on aging advise that bathroom doors be hinged to open out toward the hall, rather than into the bathroom. If anyone should fall against the door while using the bathroom, they won’t block helpers’ access.

Floors

Slick or highly polished marble, ceramic, or porcelain tiles can be very hazardous when wet, and can cause injuries due to a fall. Choose from a wide variety of materials that have a matte, honed, or somewhat textured finish to increase traction. With age, the human body is more sensitive to cool or colder surfaces; for colder climates, radiant floor heating is an easily installed option with many types and styles available.

Counters

The selection of countertop materials is often based on cost and aesthetics, but maintenance of the counter also should be considered. Because aging users with diminished eyesight may not notice that cleaning is needed, counter material that is much more resistant to bacterial growth is worth exploring.

Providing a 36‐in.‐high counter as well as a 30‐in.‐high counter with a bench allows for a variety of users, seated or standing, tall or short. This provision is more important than double sinks, which often reduce necessary counter space.

Storage

Full‐extension drawer glides and pullout drawer storage below counters allow for more accessible storage. Lever handles are more easily operated no matter the users’ age or ability.

Accessible bathroom design plan

ACCESSIBLE TOILETS AND TOILET SEAT HEIGHTS

Although the selection of toilets and bidets is usually based on personal choice, the seat height of toilets is an major factor. Taller seats (17–18 in.) are usually found in two‐piece sets. While taller seats are preferable for ambulatory people who might have difficulty standing up, they may pose a problem for shorter users.

Grab Bars

Grab bars are critical elements in the lives of many people with mobility issues. They allow for safe toilet transfer, and provide a secure grip when entering and leaving a tub or shower. They can assist someone in bending over to towel off. Grab bars also can assist nondisabled users by preventing accidental falls.

Grab bars come in five types or styles, some with higher aesthetic appeal—especially important to avoid creating an institutional appearance in a residence:

  • Standard common style that mounts directly to studs or plywood
  • Ceiling/wall‐ or floor/wall‐mounted versions
  • Seat‐mounted bars that attach to the sides of the toilet; these do not have sufficient stability to meet accessibility codes
  • Portable bars that screw and clamp to the sides of a tub; these may not meet accessibility codes
  • Swing‐away support bars that pivot up and away; these may not meet accessibility codes

A standard grab bar must be firmly and securely installed directly into the studs or into walls that have been reinforced with wood framing or faced with a minimum ¾‐inch sheet of plywood. Plywood is preferred as a support material as it allows for the placement of most grab bars along a wall and in a number of locations based on users’ preference.

SHOWERS IN ACCESSIBLE BATHROOM DESIGN

When existing conditions permit or in new construction, design a shower area with a zero‐clearance entry to provide easy entrance and exit. Plan for the water controls to be located near the entrance rather than under the showerhead. Include a handheld showerhead, grab bar, and a seat for an extra measure of safety, comfort, and security. A post on the interior design and home improvement site Houzz suggests some creative solutions, such as leaving out a shower door in warmer climates, a wall-hung toilet, and a floor with a one-way slope.

Outdoor Kitchens—Residential Kitchen Design


An outdoor kitchen is an excellent way to equip your backyard for entertaining and feeding hungry friends and family. Outdoor kitchens range from small areas with little more than a built-in barbeque grill to large, fully equipped kitchens complete with one or more grills, countertops, sinks, bars, and storage cabinets. Other features may include circular fire pits or a masonry fire pit section. Their popularity has grown dramatically over the past fifteen years.

Outdoor Kitchen, L-Shaped

KITCHEN PLANNING GUIDELINES FOR THE OUTDOORS

When planning an outdoor kitchen, the designer should determine how the kitchen will be used by asking a number of vital questions: What types of meals will be prepared—gourmet, basic grilling, or smoking? Will food preparation take place inside or outside? How many cooks will need to use the outdoor kitchen at one time? Does the kitchen need to be accessible? Is refrigeration required?

The outdoor kitchen can be as basic as a grill or as complex as a typical indoor kitchen, but one thing remains consistent: the more complex the kitchen, the greater will be the demand for services. The connections for gas, water, and electricity generally will all come from the home itself. In planning for the outdoor kitchen, remember to check whether these existing services can handle the added capacity. This, of course, leads to even more questions. Will hot and cold water be required? How will drains tie into the existing sanitary and storm sewer systems?

According to Amanda Lecky of This Old House magazine, there are three basic types of outdoor kitchens: movable, prefab, and custom. Movable is the smallest and cheapest, while custom is—predictably—the most expensive but also the most flexible and customizable.

OUTDOOR KITCHEN LAYOUT

Planning an outdoor kitchen requires two major facets of design: the layout of the kitchen itself, and the layout of the kitchen site within the larger context of your property. When choosing a site, the designer should consider how convenient the space is to entrances and to the indoor kitchen, as well as what obstacles might make transferring food outside difficult. Is the area flat, or will terracing be required? Will the outdoor kitchen serve food to people both inside and outside? Will the kitchen be sheltered from the elements, or will it be subjected to rain, wind, snow, and ice?

Despite the wide range of factors affecting an outdoor kitchen, the layout should follow the same guidelines as a normal indoor kitchen. Recommendations from the publication Kitchen Planning Guidelines, published by the National Kitchen + Bath Association, are generally as appropriate to outdoor kitchens as to indoor kitchens. Kitchen function is still broken down into zones (hot, cold, wet, and dry), although smaller outdoor kitchens may eliminate the cold and/or wet zones.

One of the most important considerations when you are planning any kitchen is to provide adequate space to prepare and organize the meal—that is, counter space. Each piece of equipment needs some counter space adjacent to it, known as “landing areas”; recommendations vary, depending on the equipment.

PATIO PLANNING

Because of their similarity in function, and the tendency of the two spaces to end up integrated into each other, the planning of outdoor kitchens is strongly tied to the planning of patios. On a confined site with only one outdoor area, the patio space should serve multiple uses, including food preparation and service. In larger gardens, a variety of outdoor spaces can enhance the sense of spaciousness and the seasonal usefulness. Here are some key tips on patio planning:

  • The patio should have some sun year round, especially in northern climates. Use deciduous trees, arbors, and awnings for summer shade.
  • Plan the house to screen the patio from the street and from neighboring houses, including upper windows. The acceptable level of privacy will range from secluded (for sunbathing) to minimal (for gardening). Use fences, walls, arbors, and planting for privacy.
  • A dining patio must be convenient to the kitchen, but other patio areas might be related to the living room or remote from the house.
  • The patio should be generous in size. Furniture dimensions that are acceptable indoors seem smaller outdoors, and people prefer more room. Use paving materials that are nonslip, such as stone, brick, concrete, wood deck, and grass.
  • To ensure public safety, many jurisdictions require that a swimming pool be enclosed by a minimum 4‐ft.‐high fence with a gate. Check local codes. Pools are often covered and/or drained for winter and are not as attractive as they are in the summer. Keep this in mind when locating the pool.

CIRCULAR FIRE PITS

A wide range of outdoor cooking equipment is available to enable frying, wok cooking, pizza making, and lobster or crab boils. In addition to typical refrigerators and freezers, wine coolers and beer dispensers are also available for storing and chilling food and beverages. However, one of the most welcoming appliances for an outdoor kitchen is a circular fire pit.

Built‐in fire pits—basically a contemporary version of a campfire—serve as a focal point to bring people together outside. They extend the season for using outdoor space and can provide welcome warmth when a chill sets in. In addition, they can be used for grilling.

Before constructing a fire pit, consult local codes and ordinances. Some areas have regulations preventing or limiting open flames. In any instance, the priority of the fire pit design is to safely contain the fire.

The optimal size for a fire pit is 36 to 44 in. in diameter. A fire pit should sit low to the ground, with its walls rising no more than a foot above grade. Fire pits are often shop-fabricated from copper or other metals and may be purchased from garden or outdoor furniture stores.

Outdoor kitchen's essential circular firepit
Outdoor kitchen’s essential circular firepit

FURTHER READING ON OUTDOOR KITCHENS

These and other considerations are now explored with AGS Online, “Outdoor Kitchens—Residential Kitchen Design.” This topic also includes design/size limitations, components of an outdoor kitchen, and design details for fire pits.